Name/Title
Instruction SheetEntry/Object ID
2005.08.03.03Scope and Content
Instruction sheet/pamphlet about the Bluenose Rug Hooker.
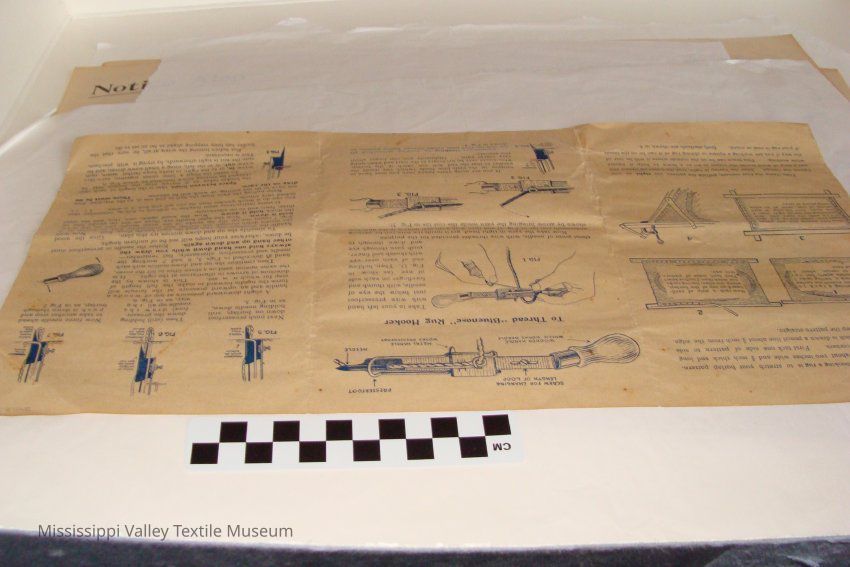
Transcription ;
Instructions for Using the
BLUENOSE RUG HOOKER
Patented, Great Britain March 20th, 1926. United States November 2nd, 1926,
Canada, November 30th, 1926
JOHN E. GARRETT
87 BRYANT STREET, MALDEN, MASS.
MANUFACTURED BY
Canadian Address :
JOHN E. GARRETT, LIMITED
NEW GLASGOW, NOVA SCOTIA
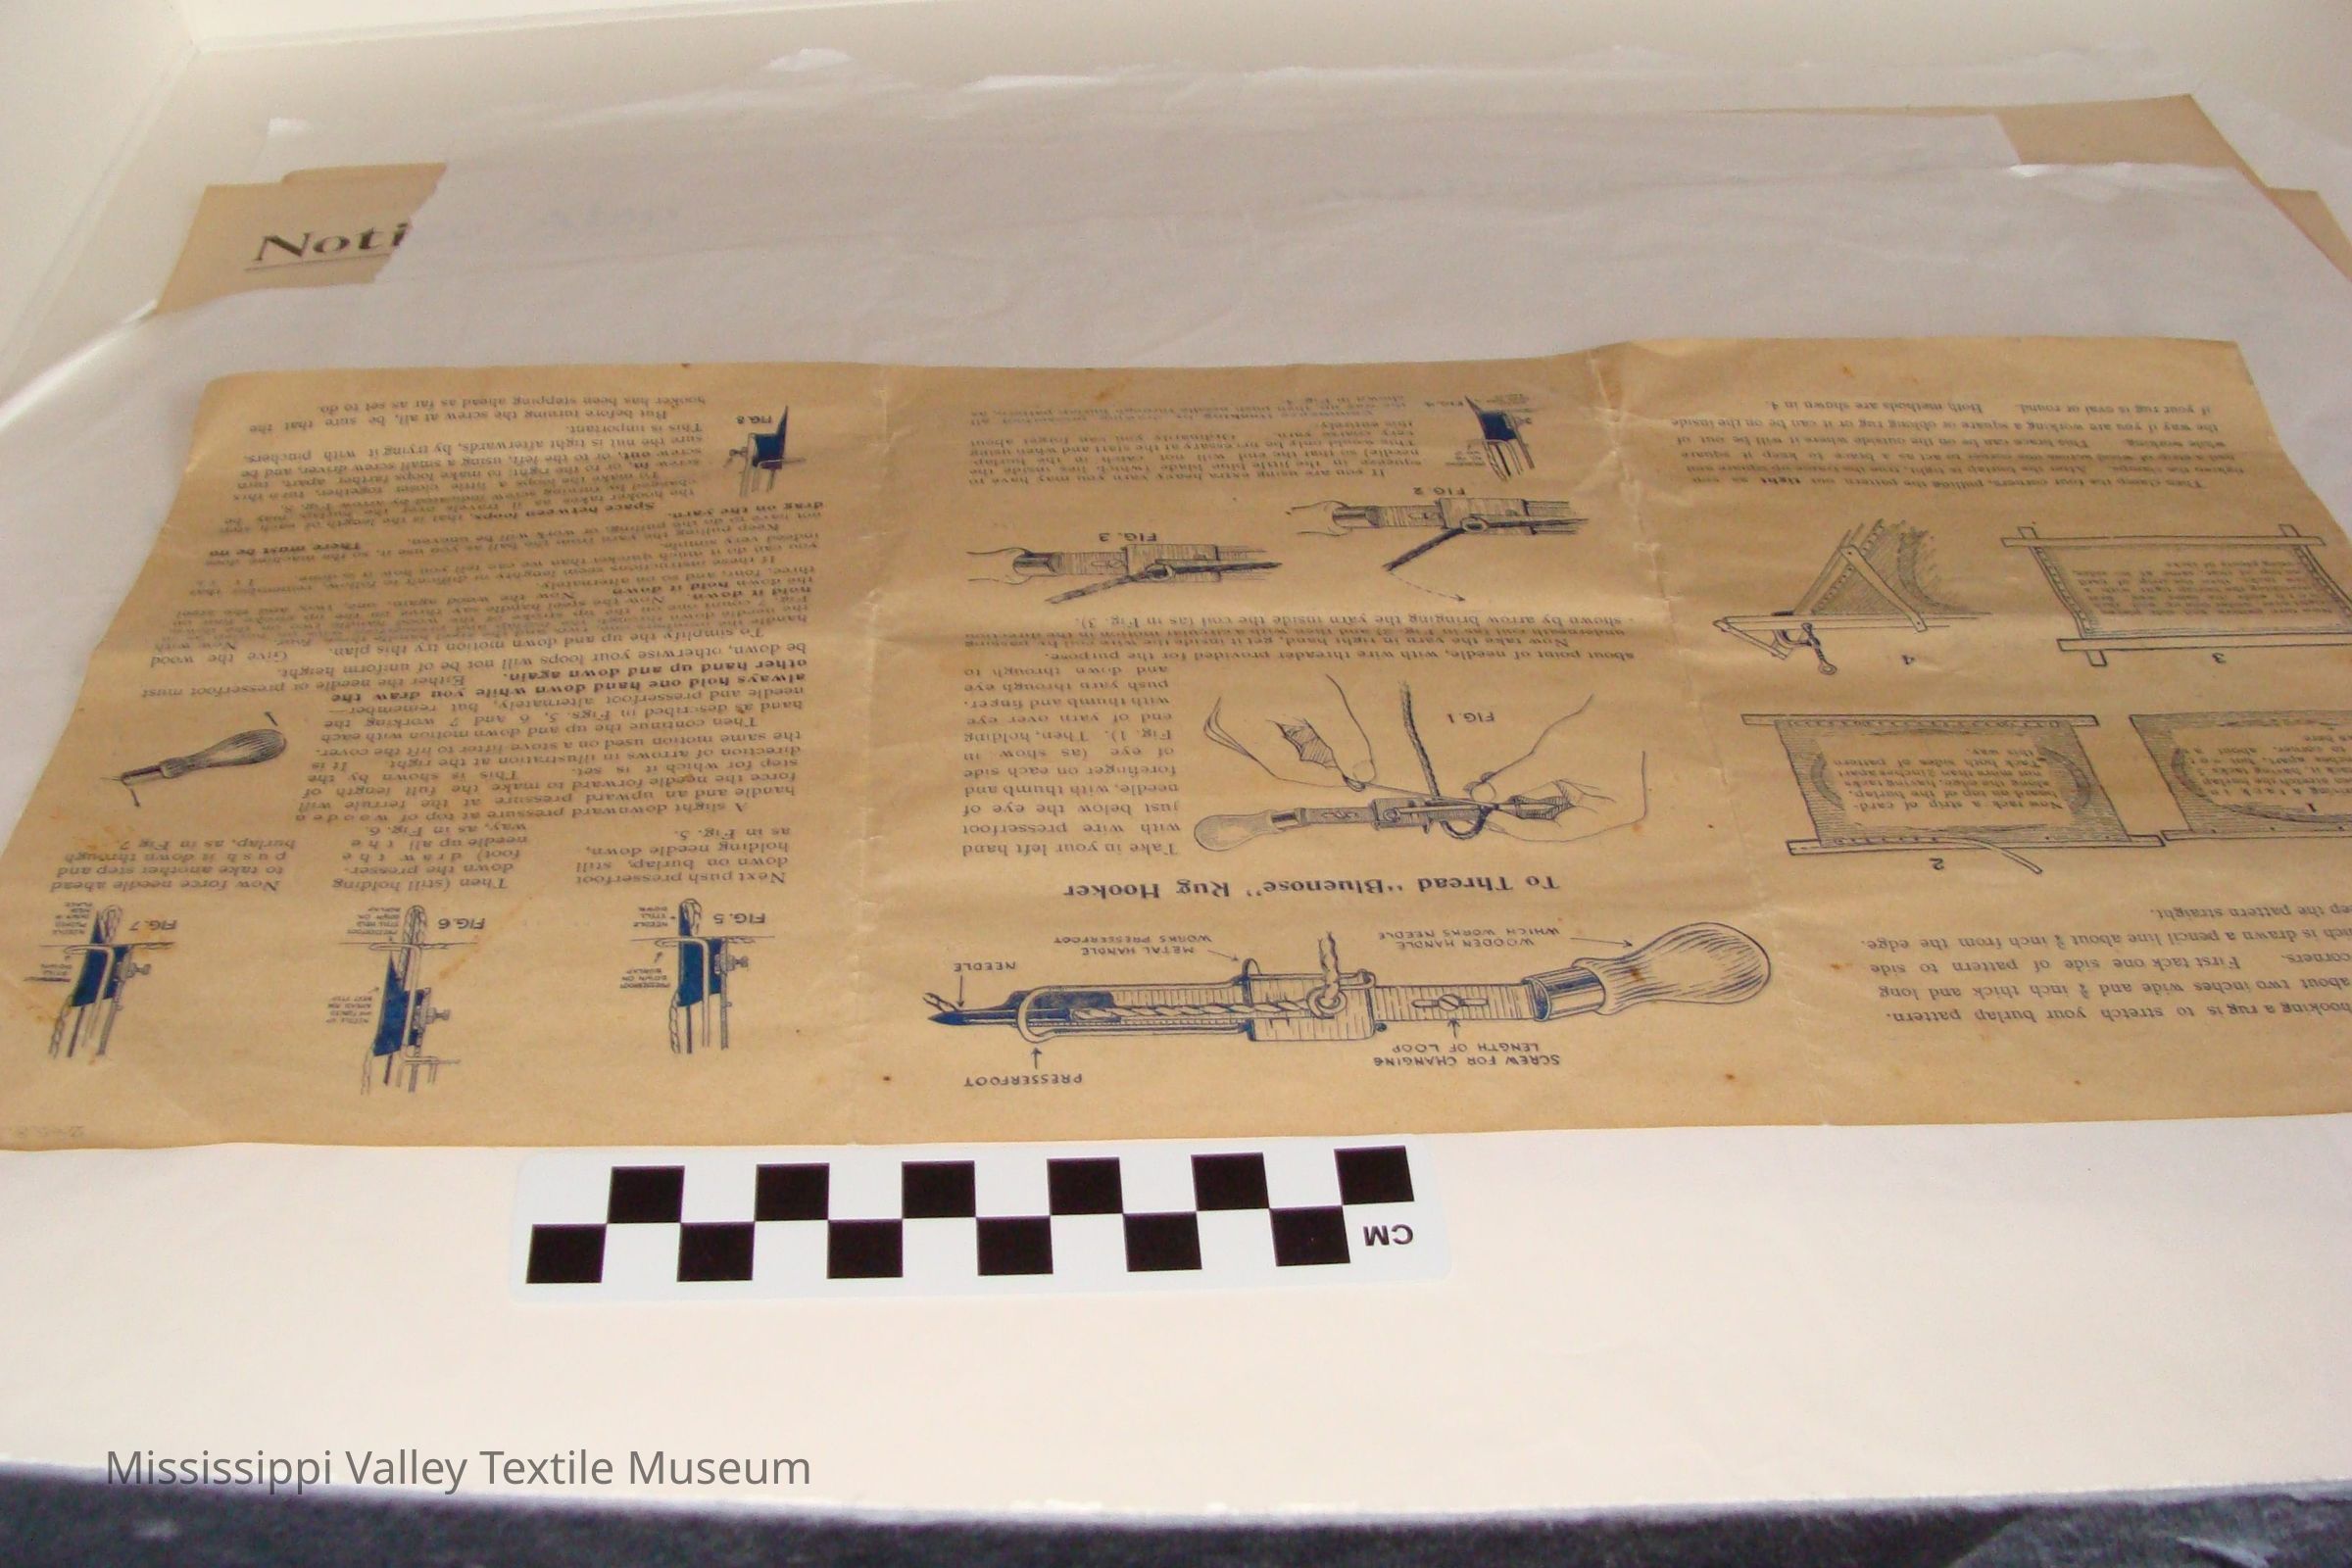
The first move in booking a rug is to stretch your burlap pattern. Get four strips of wood about two inches wide and 1é3 inch thick and long enough to cross at the corners. First track one side of pattern to side piece of frame, on which is drawn a pencil line about j1 in< b from (be edge This is a guide to keep the pattern straight.
Start by driving a tack in centre then stretch the burlap as you tack it, having-tacks 5 or 6 inches apart, but not quite to corner, about as shown here.
Now tack a strip of card-board on top of the burlap, along the edge,
having tacks not more than 2 inches
apart. Tack both sides of pattern this way.
Now turn pattern and side pieces oright over, under side up and tack b o t h ends the same way, first [stretching the burlap tight with a few tacks, then the strip of card on top of that, same as on sides, using plenty of tacks
Then clamp the four corners, pulling the pattern out tight as you tighten the clamps. After the burlap is tight, true the frame up square and nail a strip of wood across one corner to act as a brace to keep it square while working. This brace can be on the outside where it will be out of the way if you are working a square or oblong rug or it can be on the inside if your rug is oval or round. Both methods are shown in 4.
To Thread "Bluenose"
Rug Hooker
Take in your left hand with wire presserfoot just below the eye of needle, with thumb and forefinger on each side of eye (as show . in Fig. 1). Then, holding end of yarn over eye with thumb and finger, push yarn through eye and down through to about point of needle, with wire threader provided for the purpose. Now take the yarn in right hand, get it inside the wire coil by passing underneath coil (as in Fig. 2) and then wit ha circular motion in the direction shown by arrow bringing the yarn inside the coil (as in Fig. 3)
If you are using extra heavy yarn you may have to squeeze in the little blue blade (which lies inside the needle) so that the end will not catch in the burlap. This would only be necessary at the start and when using very coarse yarn. Ordinarily you can forget about this entirely.
Commence Hooking by drawing presserfoot all 4 the way up, then push needle through burlap pattern, as shown in Tig. 4.
Next push presserfoot down on burlap, still holding needle down,. as in Fig. 5.
Then (still holding down the presser-foot) draw the needle up all the way, as in Fig. 6
Now force needle ahead to take another step and push it down through burlap, as in Fig 7.
A slight downward pressure at top of wooden handle and an upward pressure at the ferrule will force the needle forward to make the full length of step for which it is set. This is shown by the direction of arrows in illustration at the right. It is the same motion used on a stove-lifter to lift the cover.
Then continue the up and down motion with each hand ah described in Figs. 5, 6 and 7 working the needle and presserfoot alternately, but remember-
always hold one hand down while you draw the
other hand up and down again. Either the needle or presserfoot must
be down, otherwise your loops will not be of uniform height.
To simplify the up and down motion try this plan. Give the wood handle the numbers one, two, and the steel handle three, four. Now with the needle down through the burlap and presserfoot wire on burlap as in i Fig. 7 count one on the up stroke of the wood handle two on the down, hold it down. Now the steel handle say three on the up stroke four on the down hold it down. Now the wood again, one, two, and the steel three, four, and so on alternately. .
If these instructions seem lenghty or difficult to follow, remember that you can do it much quicker than we can tell you how it is done. It is indeed very simple. >
Keep pulling the yarn from the ball as you use it, so the machine does not have to do the pulling, or work will be uneven. There, must be no drag on the yarn.
Space between loops, that is the length of each step the hooker takes as it travels over the burlap, may be changed by turning screw indicated by arrow Fig. 8.
To make the loops a little closer together, turn this screw in, or to the right; to make loops farther apart, turn screw out, or to the left, using a small screwdriver, and be sure the nut is tight afterwards, by trying it with pinchers. This is important.
i But before turning the screw at all, be sure that the hooker has been stepping ahead as far as set to do.
Be careful not to nick edges of needle with scissors. If edges of needles should become rough from any cause, they should be smoothed off with piece of fine emery cloth. Rough edges might cut burlap.
All loose ends of yarn should be pushed through to top side of rug (use wire threader for this) and clip them off on topside. Do this before taking rug out of frame. Leave 1A inches of plain burlap outside the hooking. After taking rug out of frame turn this plain burlap edge under and hem.
If your first rug is a little too rough to please you, get a small wire brush at the hardware store, give the rug a good brushing and clip off the fuzz. You could do this several times. It will give your rug a soft velvety appearance. Or, you can smooth it with a hot iron and damp cloth without brushing it.
keep it in good shape.
Be sure and keep your Bluenose Hooker greased* It will not work satisfactorily if let go dry. A little vaseline on the sliding parts will.
You will find it very convenient to hang the threader on a string around your neck while working; then you wilt not waste time looking for it
If at any time you have occasion to replace a needle or a blue spring loosen the nut indicated by the arrow and take them off as shown by dotted lines.
Before taking the needle and blue spring apart, note carefully how they are ppt together, so that you will have no trouble in assembling them. First slide the square nut across back of'the needle through the two oval - slots, then slide blade of blue spring down inside the needle" till you can^; insert screw through hole in little box and into nut, just a turn or 'two/^ Now put this assembly back on bar, slide it up till end of bar is against end of box or as far as it will go before tightening screw and nut. '
Price of Needle, 10c. Price of Blue Box Spring, 10c.
(Printed in Canada)
Changing height of loops - if you want to make longer loops - loosen the little screw which is in the slot near the wood handle, slide screw up towards'handle and tighten screw.
lf you want to make shorter loops, slide screw down, away from handle. Be sure to tighten screw so that it will not move.
Avoid Crowding
Crowding the work too closely,-wastes yarn-does not look well-and is liable to break threads in burlap. It is a common fault with beginners to work the loops too close together, especially in working the design. You should not try to cover up all the burlap on the side on which you are working (which is the under side of rug). Although burlap may be visible on this side, the loops will spread out on top side of rug and cover up the burlap completely.
In working the plain ground-work after the flowers, etc are finished the best way is to hook one row of the ground-work color all around the finished design, then fill in the rest of the ground color in straight rows (as shown in illustration of girl working pattern No. R-2). Leave two threads of burlap between each row if you are using fine rug yarn, and three threads of burlap if you are using coarse rug yarn.
The Bluenose Rug Hooker does beautiful work with ordinary knitting yarn, using two or three strands together in the needle. The ideal hooked rug has two threads of burlap between each loop and two threads of barlap between the rows of loops. This applies particularly to the burlap used for Bluenose Rug Patterns, and as we are the largest manufacturers of Burlap Patterns on the North American Continent, we have had this Burlap made for years exactly to our specifications, as to weight, size of thread and number of threads to the inch.
Some burlaps are woven too closely and with small threads which will break while hooking, other burlaps are woven too openly and will not bold yarn or rag securely. We do not hesitate to say the burlap used for Burlap Rug Patterns is the best obtainable for this purpose.
Turning Corners
In making a sharp turn, such as the point of a leaf or scroll, hold the metal handle down and wood handle up, the reason being, that when the metal handle only is down, there is just one single blade in the burlap, and the hooker can be easily turned in any direction.
To Cut Off Yarn
When you finish a row of hooking, ready to start a new one, or when you want to change yarn in the hooker,-Hold needle down in the burlap, and give the metal handle an extra stroke, then give the metal handle another extra stroke as you draw needle out of burlap. This pushes extra yarn thru so the last loops won't be pulled out. o Now clip yarn off close to burlap with sharp pointed scissors.
[end]Collection
Textile IndustryCataloged By
Lay, KatrinaLexicon
Nomenclature 4.0
Nomenclature Primary Object Term
Book, InstructionNomenclature Sub-Class
Instructional DocumentsNomenclature Class
Documentary ObjectsNomenclature Category
Category 08: Communication ObjectsSearch Terms
InstructionsLocation
Location
Container
Box 5Shelf
Shelf 19Room
Collections RoomBuilding
M.V.T.M.Category
PermanentDate
November 7, 2023Location
Container
Archive Box 1Shelf
1, 1Room
Collections RoomBuilding
M.V.T.M.Category
PermanentMoved By
MacMillan, LindsayDate
November 26, 2020Location
Container
Box 5Shelf
Shelf 19, Shelf 19Room
Collections RoomBuilding
M.V.T.M.Category
PermanentMoved By
MacMillan, LindsayDate
November 26, 2020Location
Container
Box 2Shelf
Shelf 12, Shelf 12Room
Collections RoomBuilding
M.V.T.M.Category
PermanentMoved By
Moxley, MatthewDate
June 1, 2011General Notes
Note
Status: OK
Status By: Cotter, Ellen
Status Date: 2022-02-08Created By
admin@catalogit.appCreate Date
July 22, 2005Updated By
admin@catalogit.appUpdate Date
November 12, 2023