Name/Title
Instruction SheetEntry/Object ID
2005.09.01.09Scope and Content
Instructions for Lesson1 of Mrs. Sanders' dress cutting course. Illustration of Mrs. Sanders dress labelled with cuts. Ledger sheet folded in half printed on side of half only.
Transcription :
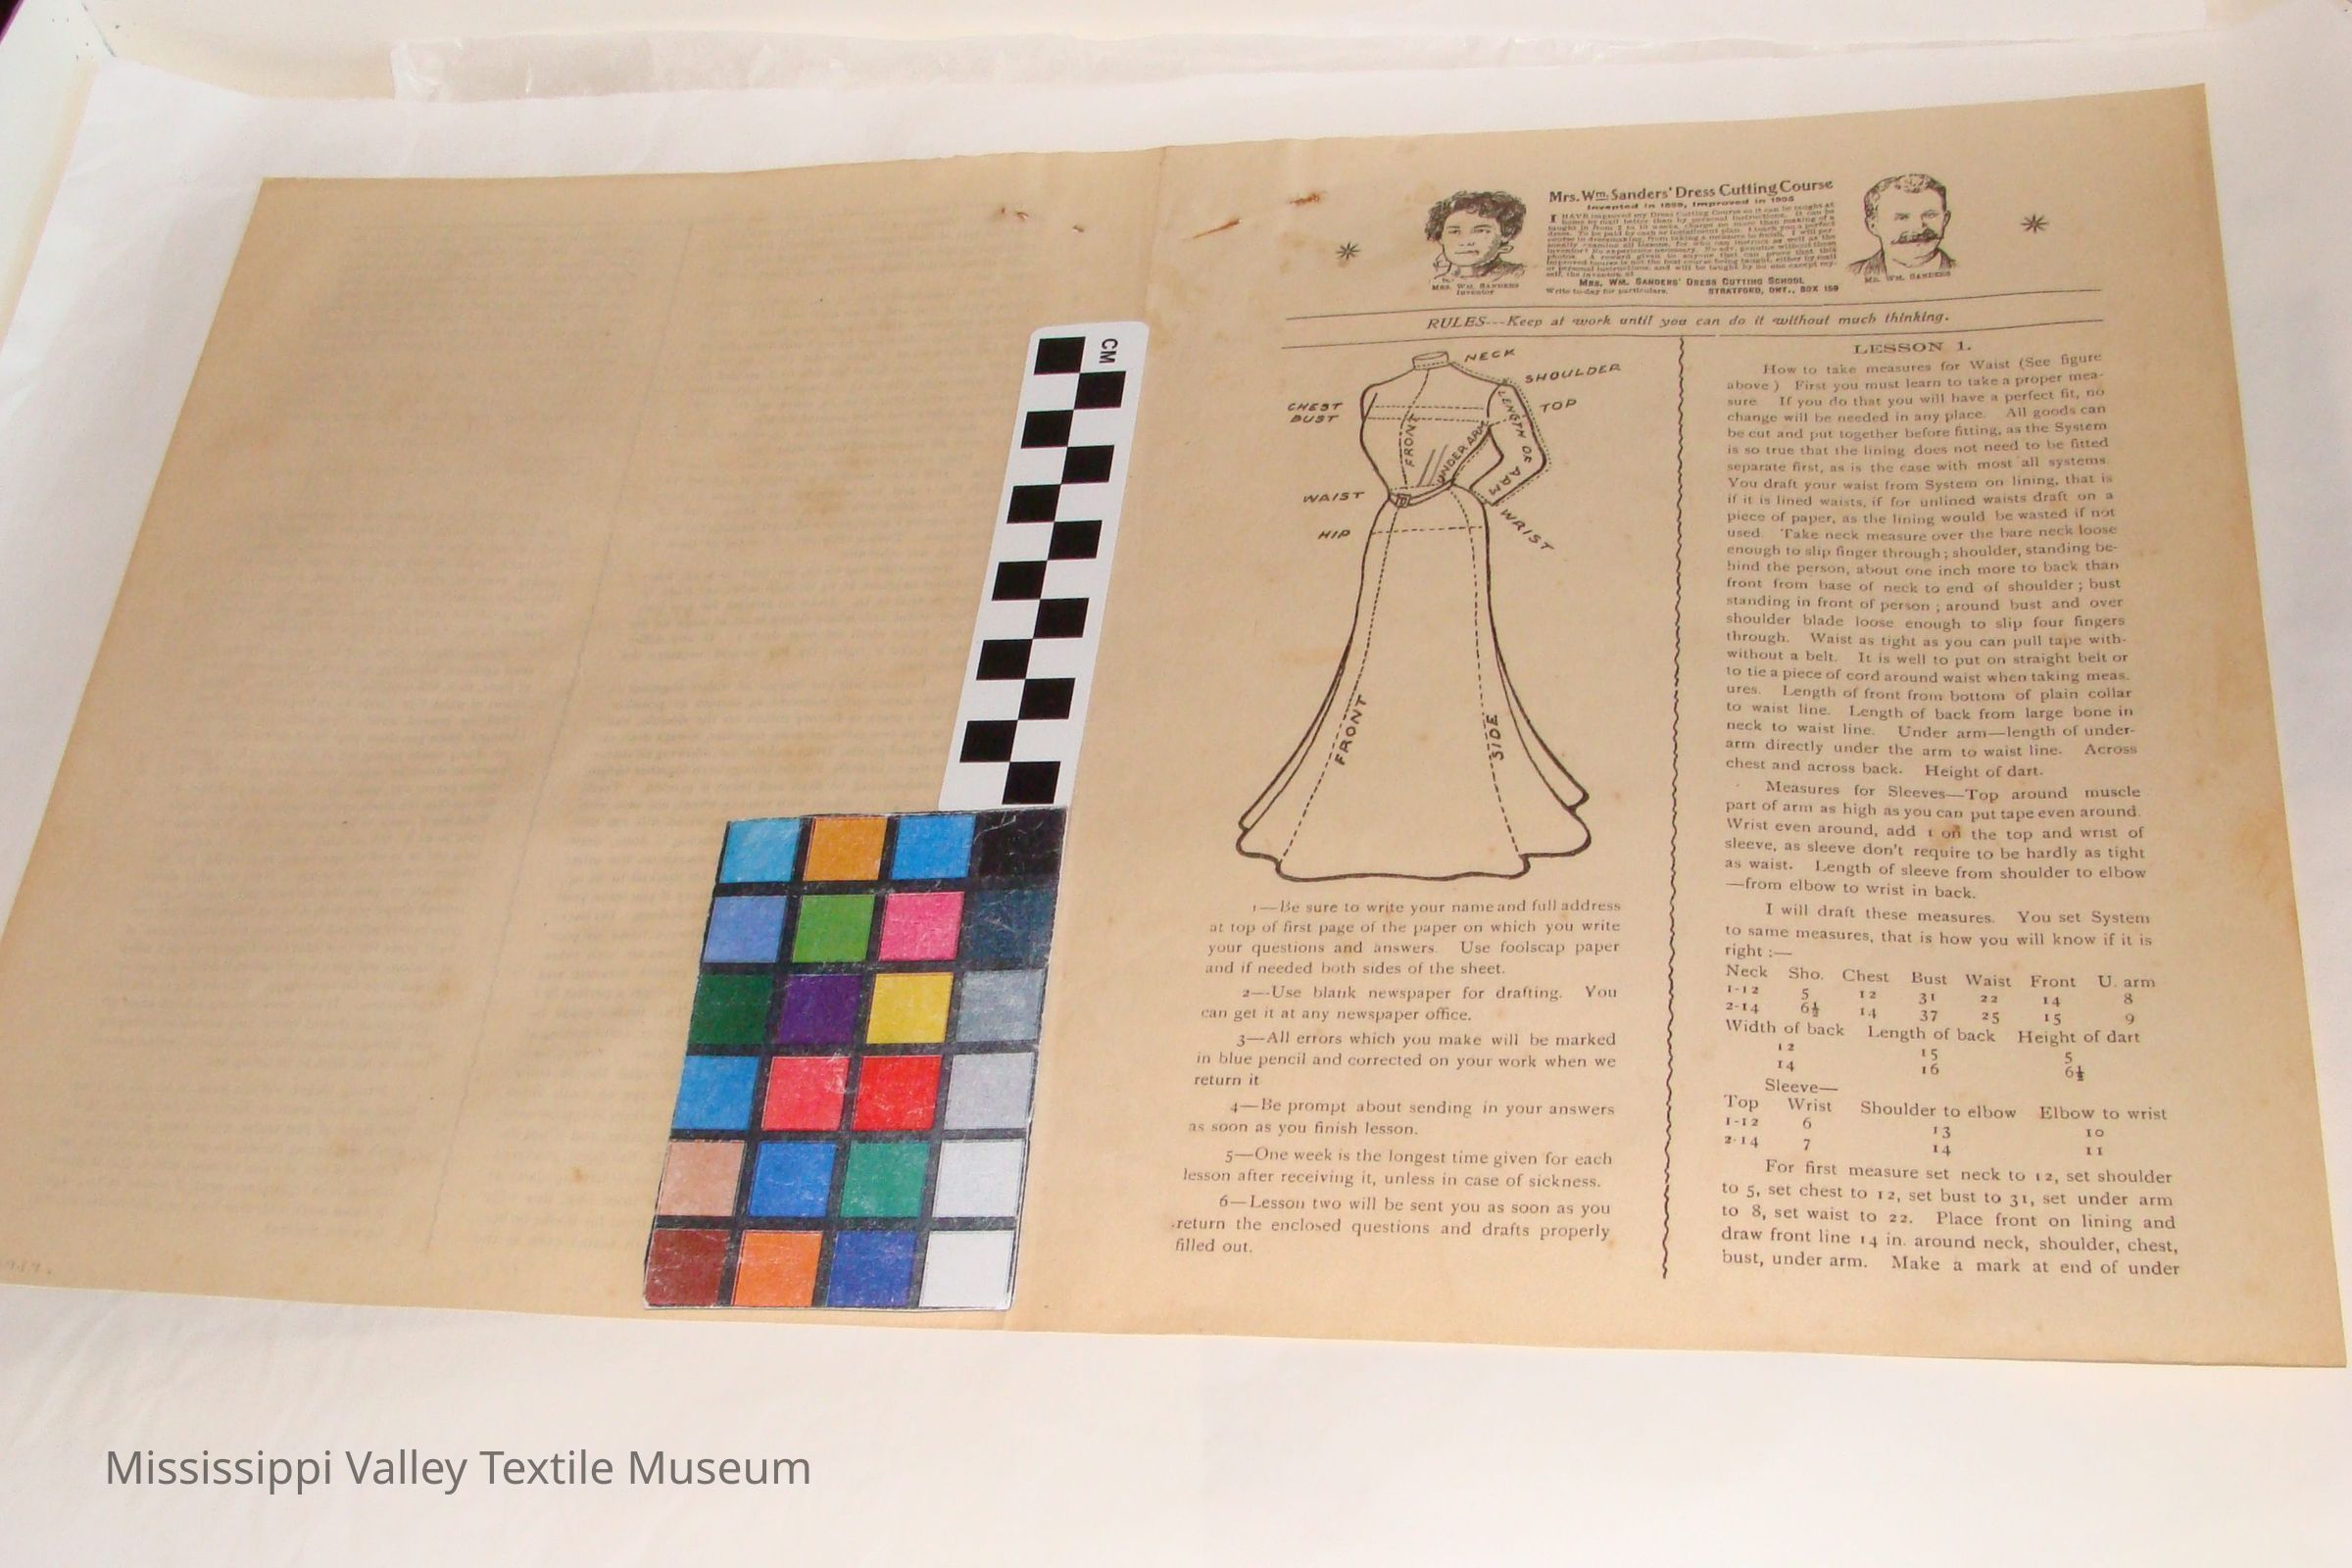
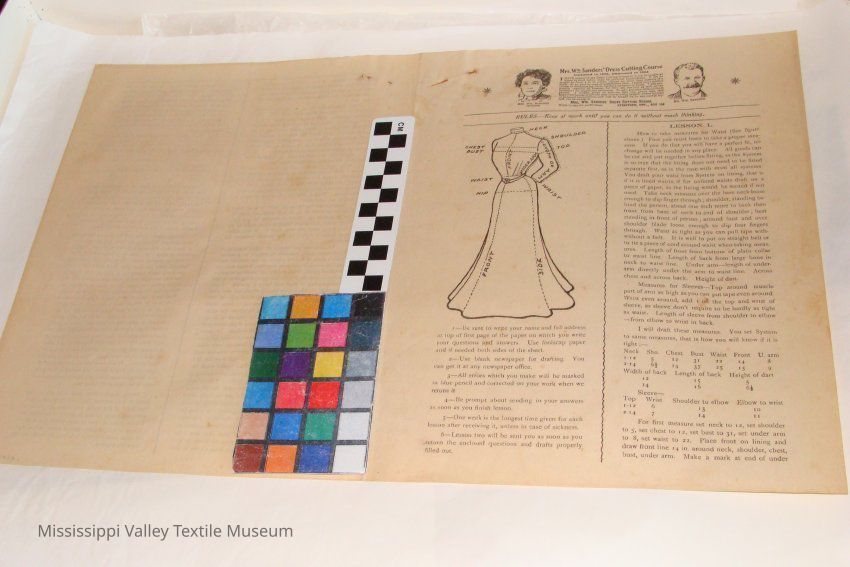
Mrs.WmSanders' Dress CuttingCourse
Invented in 1899" Improved in 1905
T HAVE improved my Dress Cutting Course so it can be taught at home by mail better than by personal instructions. It. can be taught in from 2 to 10 weeks, charge no more than making of a dress. To be paid by cash installment plan. I teach you a perfect course in dressmaking, from taking a measure to finish. 1 will personally examine all lessons, for who can instruct as well as the inventor? No experience necessary. No adv. genuine without these photos. A reward given to anyone that can prove that this ".. improved bourse is not the best course being taught, either by personal Instructions, and will be taught by no ono except myself, the Invention, at
MRS. Wm. SANDERS' DRESS CUTTING SCHOOL
Write to-day for partiulars. STRATFORD, ONT., BOX 169
LESSON 1.
How to take measures for Waist (See figure above ) First you must learn to take a proper measure. If you do that you will have a perfect fit, no change will be needed in any place. All goods can be cut and put together before fitting, as the System is so true that the lining does not need to be fitted separate first, as is the case with most all systems. You draft your waist from System on lining, that is if it is lined waists, if for unlined waists draft on a piece of paper, as the lining would be wasted if not used. Take neck measure over the bare neck loose enough to slip finger through; shoulder, standing behind the person, about one inch more to back than front from base of neck to end of shoulder; bust standing in front of person ; around bust and over shoulder blade loose enough to slip four fingers through. Waist as tight as you can pull tape with- without a belt. It is well to put on straight belt or to tie a piece of cord around waist when taking meas. ures. Length of front from bottom of plain collar to waist line. Length of back from large bone in neck to waist line. Under arm-length of underarm directly under the arm to waist line- Across chest and across back. Height of dart.
' Measures for Sleeves-Top around muscle part of arm as high as you can put tape even around. Wrist even around, add i on the top and wrist of sleeve, as sleeve don't require to be hardly as tight as waist. Length of sleeve from shoulder to elbow -from elbow to wrist in back.
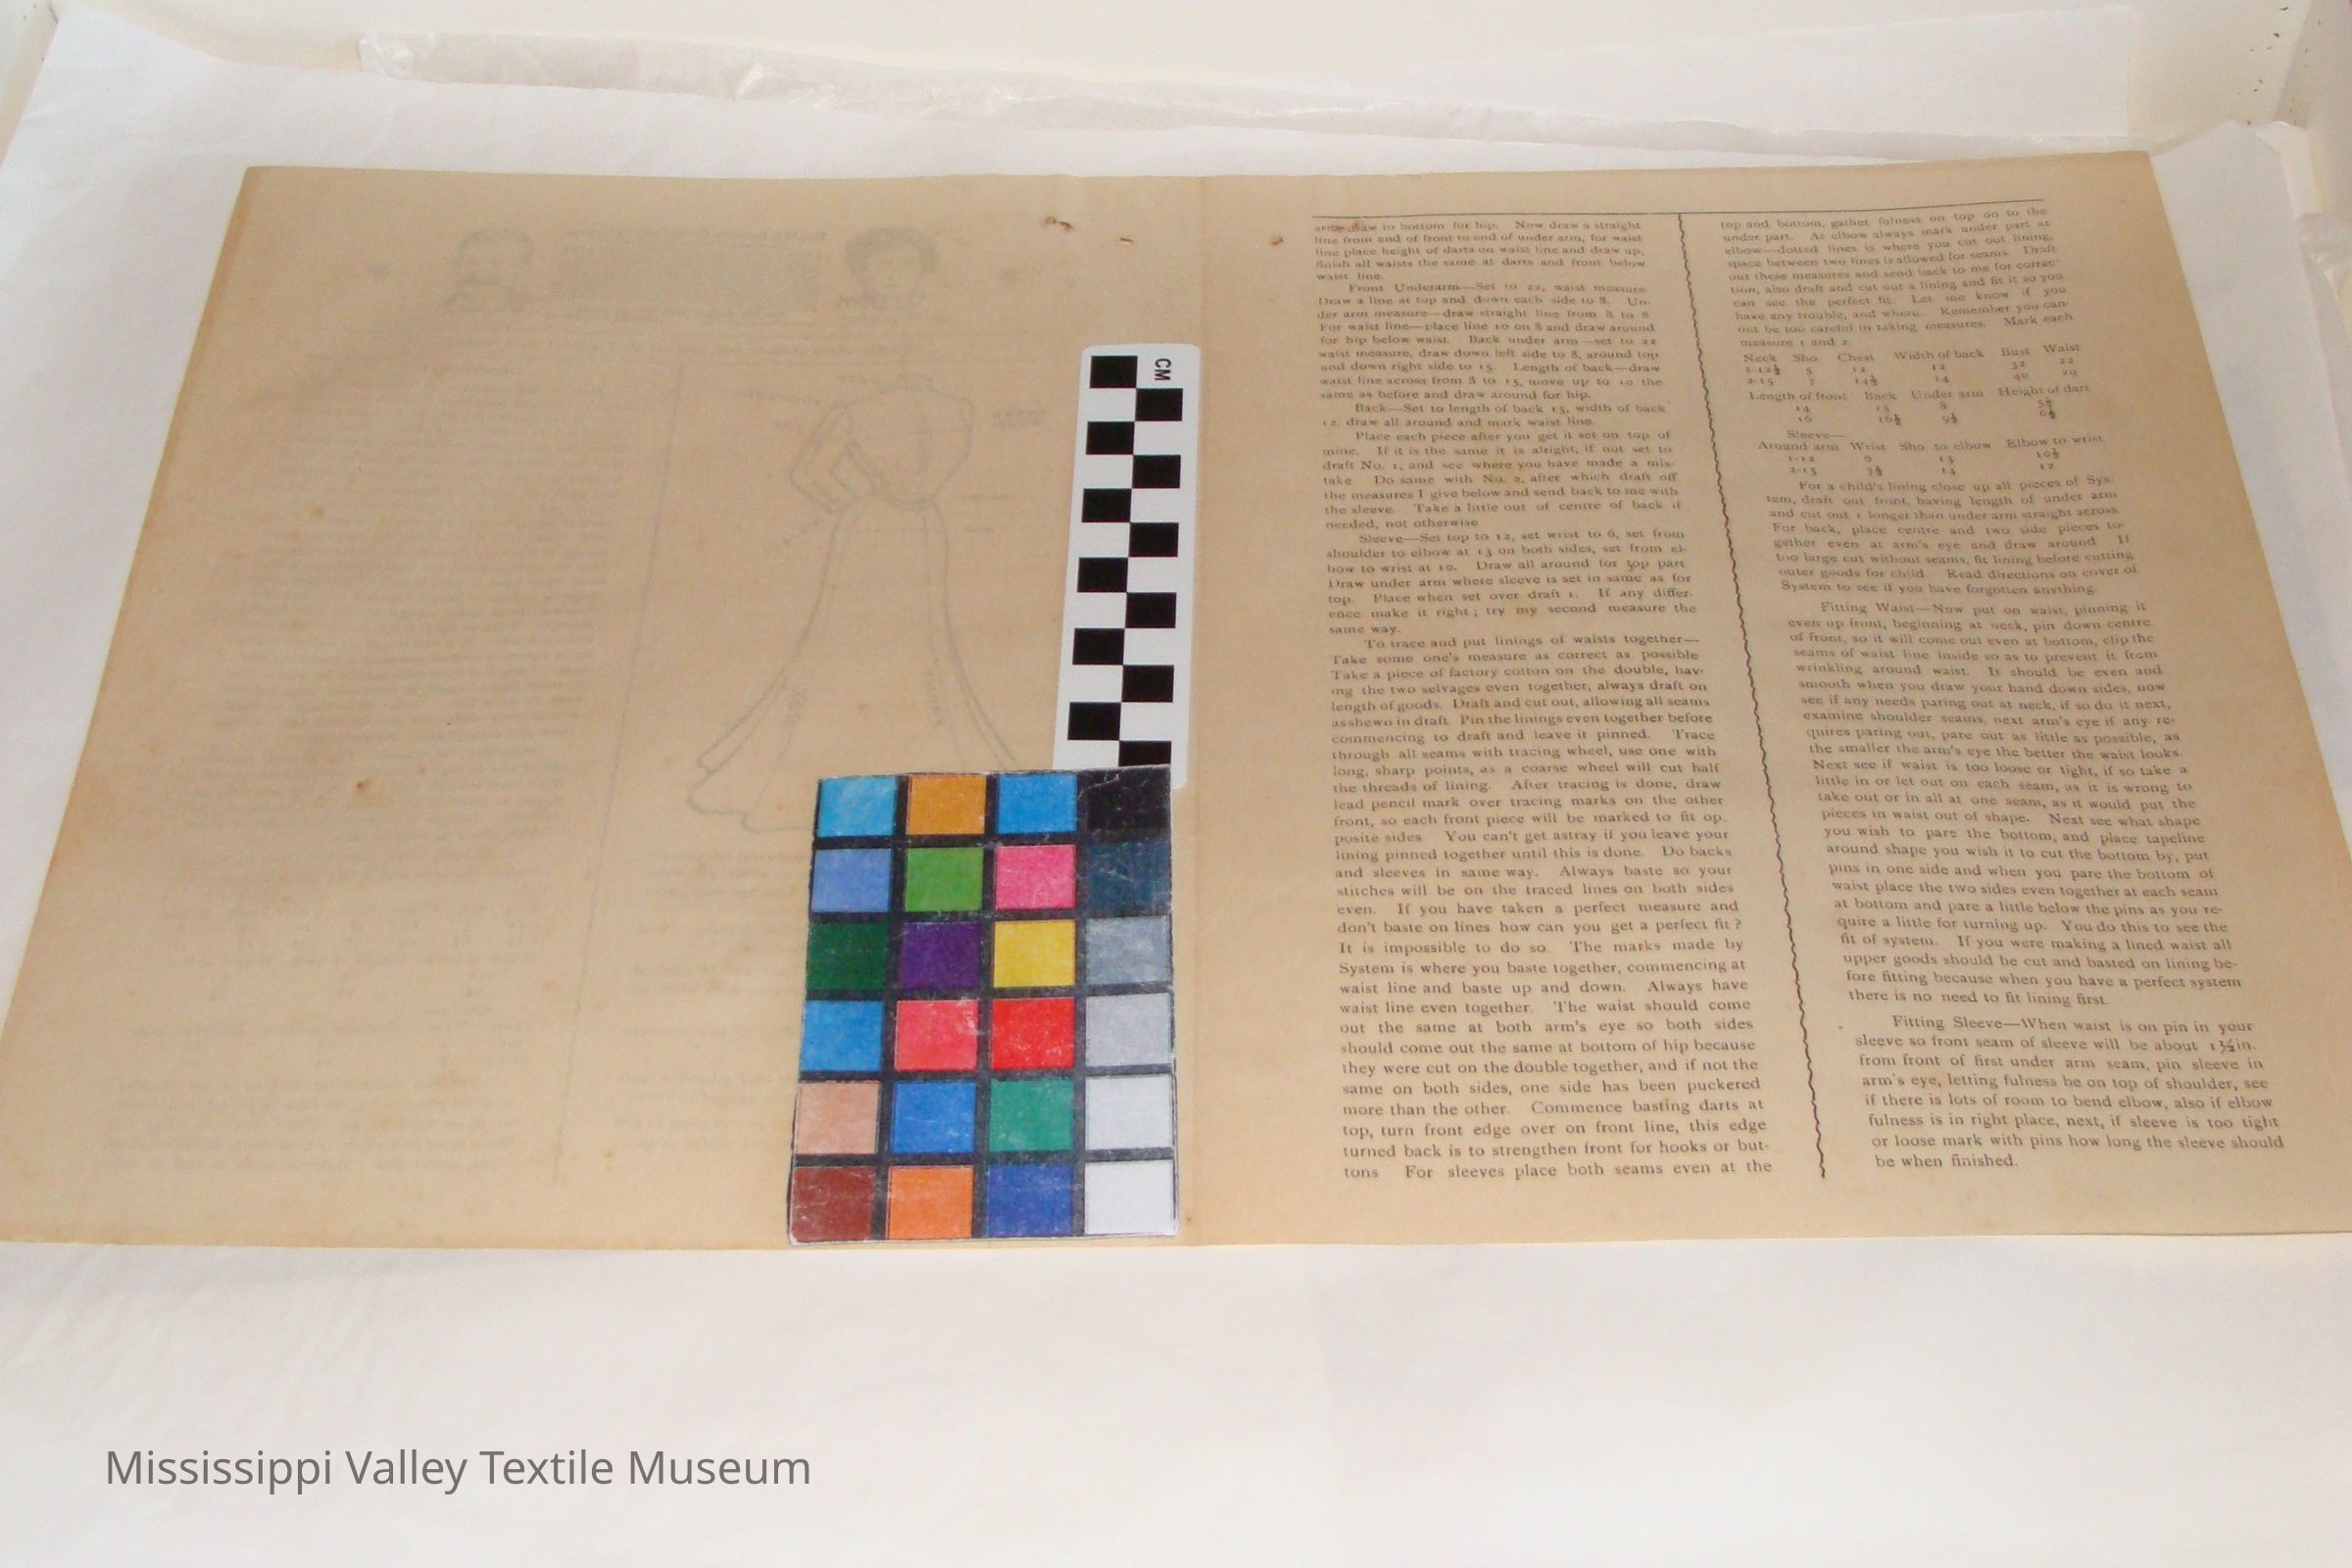
arrf^ draw to bottom for hip. Now draw a straight line from end of front to end of under arm, for waist line place height of darts on waist line and draw up, finish all waists the same at darts and front below waist line.
Front Underarm-Set to 22, waist measure. Draw a line at top and down each side to 8. Under arm measure-draw straight line from 8 to 8 For waist line-place line 10 on 8 and draw around for hip below waist. Back under arm-set to 22 waist measure, draw down left side to 8, around top and down right side to 15. Length of back-draw waist line across from 8 to 15, move up to 10 the same as before and draw around for hip.
Back-Set to length of back 15, width of back t 2, draw all around and mark waist line.
Place each piece after you get it set on top of mine. If it is the same it is alright, if not set to draft No. 1, and see where you have made a mistake Do same with No. 2, after which draft off the measures I give below and send back to me with the sleeve. Take a little out of centre of back if needed, not otherwise
Sleeve-Set top to 12, set wrist to 6, set from shoulder to elbow at 13 on both sides, set from elbow to wrist at 10. Draw all around for top part Draw under arm where sleeve is set in same as for top. Place when set over draft 1. If any difference make it right; try my second measure the same way.
To trace and put linings of waists together- Take some one's measure as correct as possible- Take a piece of factory cotton on the double, having the two selvages even together, always draft on length of goods. Draft and cut out, allowing all seams asshewn in draft. Pin the linings even together before commencing to draft and leave it pinned. Trace through all seams with tracing wheel, use one with long, sharp points, as a coarse wheel will cut half the threads of lining. After tracing is done, draw lead pencil mark over tracing marks on the other front, so each front piece will be marked to fit opposite sides. You can't get astray if you leave your lining pinned together until this is done. Do backs and sleeves in same way. Always baste so your stitches will be on the traced lines on both sides even. If you have taken a perfect measure and don't baste on lines how can you get a perfect fit ? It is impossible to do so. The marks made by System is where you baste together, commencing at waist line and baste up and down. Always have waist line even together. The waist should come out the same at both arm's eye so both sides should come out the same at bottom of hip because they were cut on the double together, and if not the same on both sides, one side has been puckered more than the other. Commence basting darts at top, turn front edge over on front line, this edge turned back is to strengthen front for hooks or buttons For sleeves place both seams even at the top and bottom, gather fulness on top on to the under part. At elbow always mark under part at elbow-dotted lines is where you cut out lining, space between two lines is allowed for seams. Draft out these measures and send back to me for correc tion, also draft and cut out a lining and fit it so you can see the perfect fit. Let me know if you have any trouble, and where. Remember you cannot be too careful in taking measures. Mark each measure 1 and 2.
Neck Sho. Chest Width of back Bust Waist
1-12I 5 1 2 1 2 32 2 2
2<5 7 '4b '4 40 29
Length of front o
Back Underarm Height of dart '5 8 5i
9i 6|
Sleeve-
Around arm Wrist Sho to elbow Elbow to wrist
1-12 6 13
2-15 ?b 14 12
For a child's lining close up all pieces of System, draft out front, having length of under arm and cut out 1 longer than under arm straight across. For back, place centre and two side pieces together even at arm's eye and draw around If too large cut without seams, fit lining before cutting outer goods for child. Read directions on cover of System to see if you have forgotten anything.
Fitting Waist - Now put on waist, pinning it even up front, beginning at neck, pin down centre of front, so it will come out even at bottom, clip the seams of waist line inside so as to prevent it from wrinkling around waist. It should be even and smooth when you draw your hand down sides, now see if any needs paring out at neck, if so do it next, examine shoulder seams, next arm's eye if any requires paring out, pare out as little as possible, as the smaller the arm's eye the better the waist looks. Next see if waist is too loose or tight, if so take a little in or let out on each seam, as it is wrong to take out or in all at one seam, as it would put the pieces in waist out of shape. Next see what shape you wish to pare the bottom, and place tapeline around shape you wish it to cut the bottom by, put pins in one side and when you pare the bottom of waist place the two sides even together at each seam at bottom and pare a little below the pins as you require a little for turning up. You do this to see the fit of system. If you were making a lined waist all upper goods should be cut and basted on lining before fitting because when you have a perfect system there is no need to fit lining first.
Fitting Sleeve-When waist is on pin in your slepve so front seam of sleeve will be about rjin. from front of first under arm seam, pin sleeve in arm's eye, letting fulness be on top of shoulder, see if there is lots of room to bend elbow, also if elbow fulness is in right place, next, if sleeve is too tight or loose mark with pins how long the sleeve should be when finished.
[end]Collection
Patterns CollectionCataloged By
Lay, KatrinaLexicon
Nomenclature 4.0
Nomenclature Primary Object Term
Book, InstructionNomenclature Sub-Class
Instructional DocumentsNomenclature Class
Documentary ObjectsNomenclature Category
Category 08: Communication ObjectsSearch Terms
InstructionsArchive Details
Creator
Mrs. W.M SandersDate(s) of Creation
1905Location
Location
Container
Box 5Shelf
Shelf 19Room
Collections RoomBuilding
M.V.T.M.Category
PermanentDate
November 7, 2023Location
Container
Box 2Shelf
Shelf 7, Shelf 7Room
Collections RoomBuilding
M.V.T.M.Category
PermanentMoved By
Whit, ElizabethDate
August 24, 2017Location
Container
Box 5Shelf
Shelf 19, Shelf 19Room
Collections RoomBuilding
M.V.T.M.Category
PermanentMoved By
Whit, ElizabethDate
August 24, 2017Location
Shelf
Shelf 12, Shelf 12Room
Collections RoomBuilding
M.V.T.M.Category
PermanentMoved By
Whit, ElizabethDate
August 5, 2016General Notes
Note
Status: OK
Status By: Cotter, Ellen
Status Date: 2022-02-08Created By
admin@catalogit.appCreate Date
July 26, 2005Updated By
admin@catalogit.appUpdate Date
November 12, 2023