Name/Title
Instruction SheetEntry/Object ID
2005.09.01.13Scope and Content
Instruction sheet for lesson 2 of Mrs. Sanders Dress cutting course. Illustration of Mr and Mrs. Sanders four blouses and flower bouquet. Ledger sized sheet folded in half. Printed on one side of half only.
Transcription:
Mrs.WM Sanders' Dress Cutting Course
Invented In 1899, Improved in 1906
I
HAVE Improved my Dress Cutting Course so it can be taught at home by mall better than by personal Instructions, It can be taught In from 2 to 10 weeks, charge no more than making of a dress. To be paid by cash Or installment plan. I teach you a perfect course in dressmaking, from taking a measure to finish. I will personally examine all lessons, for who can Instruct as well as the inventor? No experience necessary. No adv. genuine without these photos. A reward given to anyone that can prove that this improved course is not the best course being taught, either by mail or personal Instructions, and will be taught by no one except myself, the Invented at
MRS. WM. SANDERS* DRESS CUTTING SCHOOL
Write to-day for particulars. STRATFORD, ONT., BOX (65)RULES--Keep at work until you can do it without much thinking.
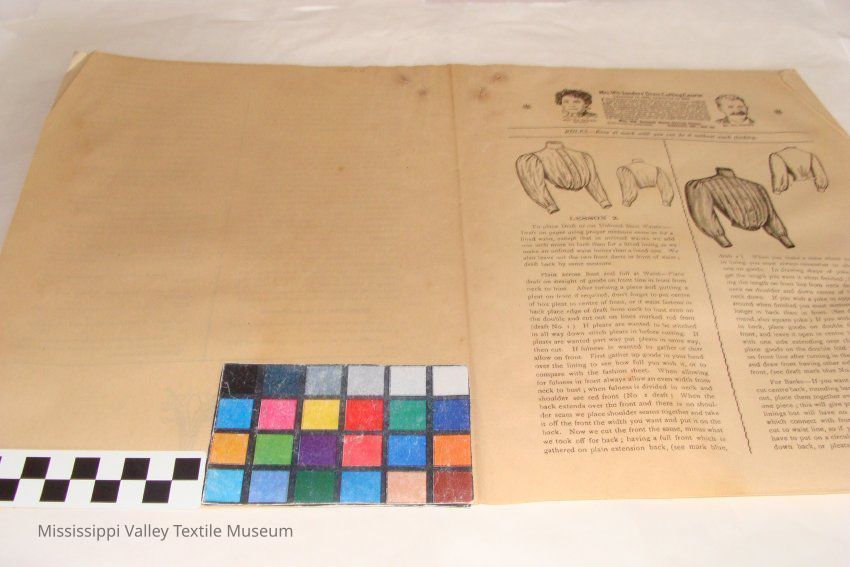
LESSON 2.
To place Draft to cut Unlined Shirt Waists:- Draft on paper using proper measure same as for a lined waist, except that in unlined waists we add one inch more to bust than for a fitted lining as we make an unlined waist looser than alined one. We also leave out the two front darts in front of waist; draft back by same measure.
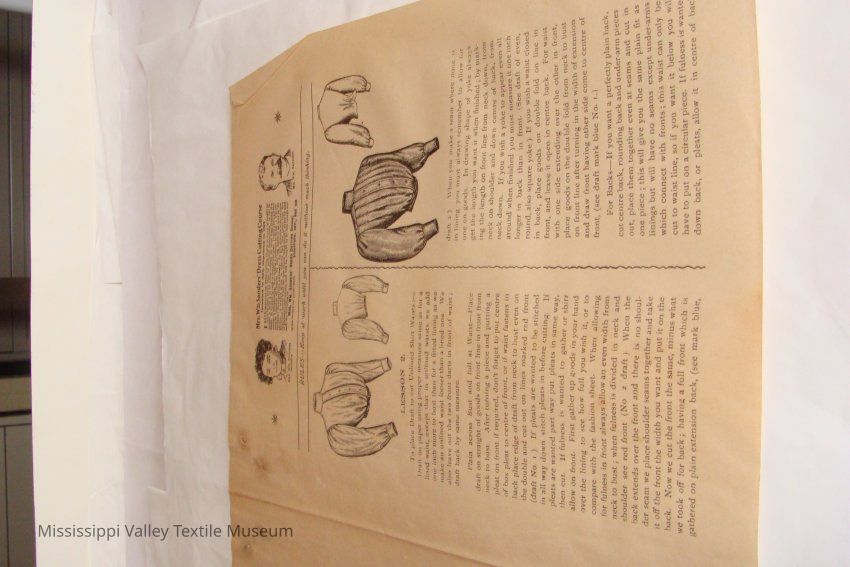
Plain across Bust and full at Waist-Place draft on straight of goods on front line in front from neck to bust. After turning a piece and putting a pleat on front if required, don't forget to put centre of box pleat to centre of front, or if waist fastens in back place edge of draft from neck to bust even on the double and cut out on lines marked red front (draft No. r.) If pleats are wanted to be stitched in all way down stitch pleats in before cutting. If pleats are wanted part way put pleats in same way, then cut- If fulness is wanted to gather or shirr allow on front- First gather up goods in your hand over the lining to see how full you wish it, or to compare with the fashion sheet. When allowing for fulness in front always allow an even width from neck to bust; when fulness is divided in neck and shoulder see red front (No 2 draft ) When the back extends over the front and there is no shoulder seam we place shoulder seams together and take it off the front the width you want and put it on the back. Now we cut the front the same, minus what we took off for back ; having a full front which is gathered on plain extension back, (see mark blue, draft 2 ) When you make a seam where none is in lining you must always remember to allow for one on goods. In drawing shape of yoke always get the length you want it when finished ; by marking the length on front line from neck down, from neck on shoulder and down centre of back, from neck down. If you wish a yoke to appear even all around when finished you must measure it one inch longer in back than in front- (See draft of even, round, also square yoke.) If you wish a waist closed in back, place goods on double fold on line in front, and leave it open in centre back. For waist with one side extending over the other in front, place goods on the double fold from neck to bust on front line after turning in the width of extension and draw front having other side come to centre of front, (see draft mark blue No- 1.)
For Backs-If you want a perfectly plain back, cut centre back, rounding back and under-arm pieces out, place them together even at seams and cut in one piece ; this will give you the same plain fit as linings but will have no seams except under-arms which connect with fronts ; this waist can only be cut to waist line, so if you want it below you will have to put on a circular piece. If fulness is wanted down back, or pleats, allow it in centre of back.
See how much one pleat will take and multiply what you get by number of pleats wanted. It for back plain across the shoulders with small pleats or fulness extending up from waist you get fullness by leaving a space in back at rounding seam, (see draft / blue marks.) If for a back without a shoulder seam, draft green shows how front piece is placed on back at shoulder seam and cut longer over shoulder, (see green marks.) o
To fit Shirt Waist-Baste under-arm seams together, commencing at waist line, also shoulder 1 commencing even at neck. If box pleat is down front don't forget to allow half of it on each side, put on to fit, pin down front, see if it is all right 1 around base of neck, next fit back, if plain, pin around waist line, commencing at centre of back, if full at back gather fulness by pleating or gathering ' in centre back, next see if seams are all right. Now fix fulness at front in right position, see what wants paring, if any, at arm's eye, next fit sleeve by seeing ( if it is too loose, tight or long, place tapeline around ( neck to see how loose you make band or collar so
it won't draw ; if fulness in neck mark in band or
collar where it should go. If any trimming in the form of straps, etc., cut out and pin on waist so they j will be right size and in good position ; next seams
are ready to stitch ; press and finish by French (
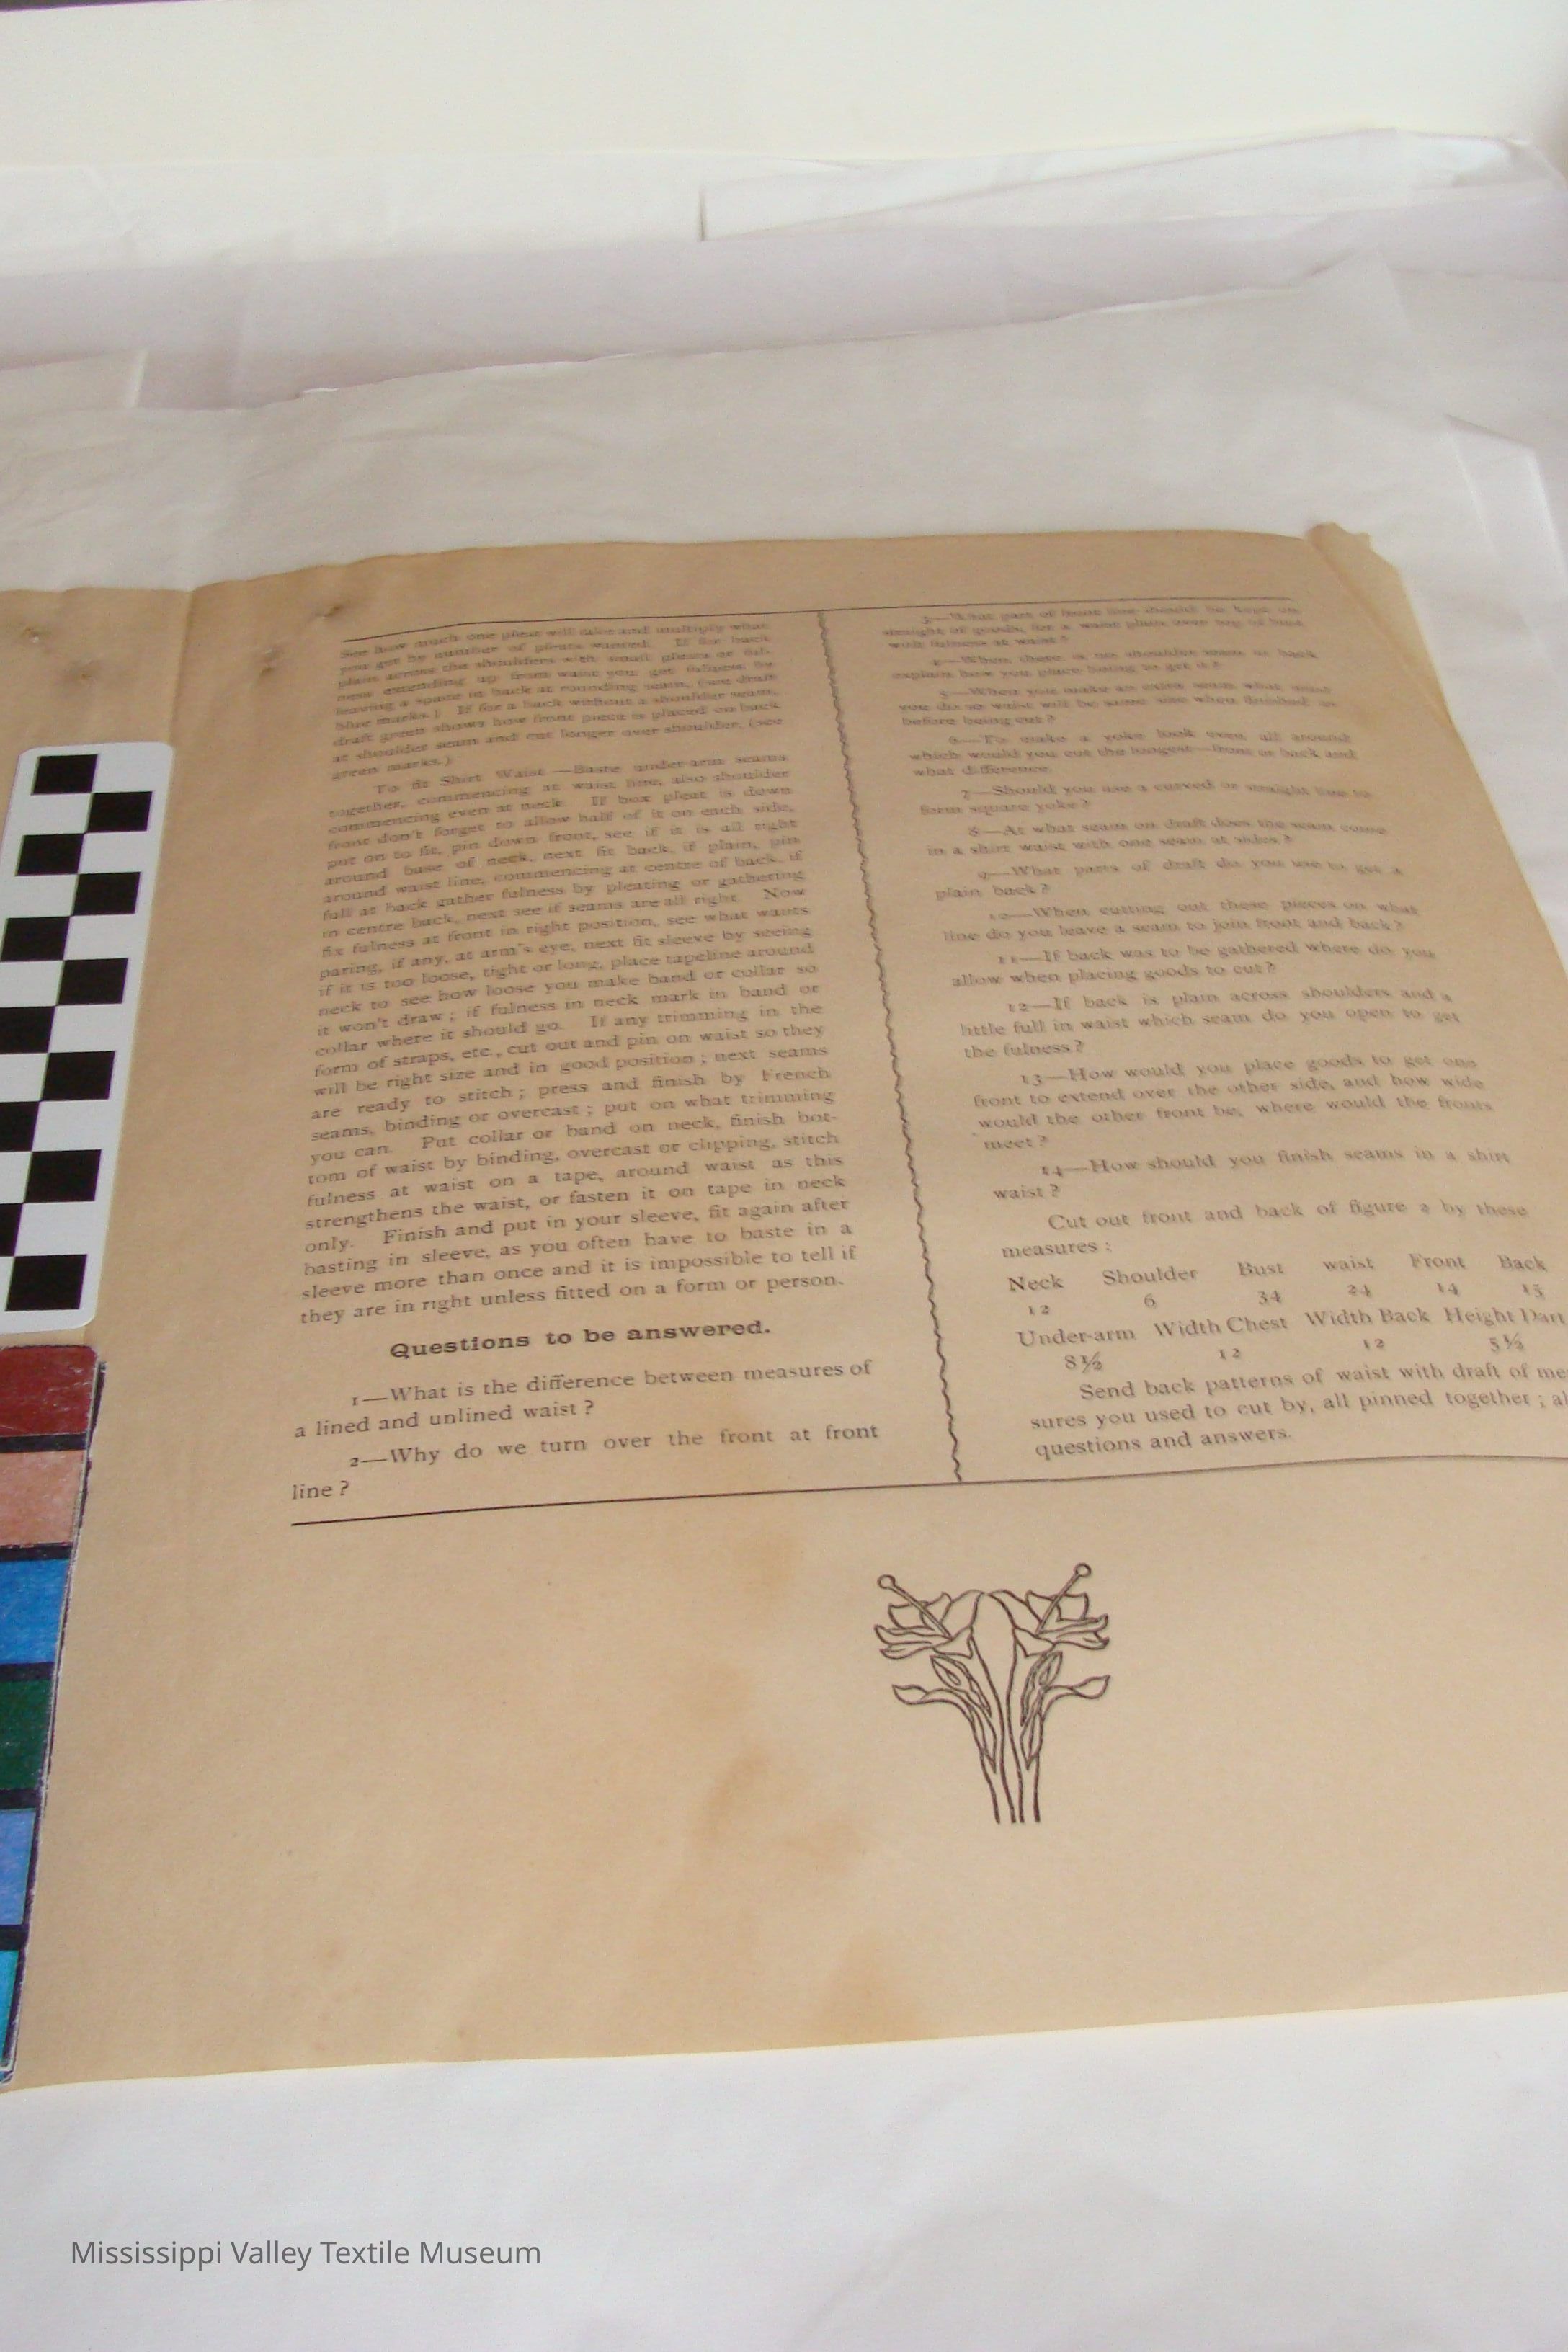
seams, binding or overcast ; put on what trimming \ you can. Put collar or band on neck, finish bottom of waist by binding, overcast or clipping, stitch fulness at waist on a tape, around waist as this strengthens the waist, or fasten it on tape in neck only. Finish and put in your sleeve, fit again after basting in sleeve, as you often have to baste in a sleeve more than once and it is impossible to tell if they are in right unless fitted on a form or person.
Questions to be answered.
i-What is the difference between measures of a lined and unlined waist ?
2-Why do we turn over the front at front line ?
[end]Collection
Textile IndustryCataloged By
Moxley, MatthewLexicon
Nomenclature 4.0
Nomenclature Primary Object Term
Book, InstructionNomenclature Sub-Class
Instructional DocumentsNomenclature Class
Documentary ObjectsNomenclature Category
Category 08: Communication ObjectsArchive Details
Date(s) of Creation
1905Archive Notes
Date(s): 1905Location
Location
Container
Box 5Shelf
Shelf 19Room
Collections RoomBuilding
M.V.T.M.Category
PermanentDate
November 7, 2023Location
Container
Box 2Shelf
Shelf 7, Shelf 7Room
Collections RoomBuilding
M.V.T.M.Category
PermanentMoved By
Whit, ElizabethDate
August 24, 2017Location
Container
Box 5Shelf
Shelf 19, Shelf 19Room
Collections RoomBuilding
M.V.T.M.Category
PermanentMoved By
Whit, ElizabethDate
August 24, 2017Location
Container
Box 2Shelf
Shelf 12, Shelf 12Room
Collections RoomBuilding
M.V.T.M.Category
PermanentMoved By
Whit, ElizabethDate
August 5, 2016General Notes
Note
Status: OK
Status By: Cotter, Ellen
Status Date: 2022-02-08Created By
admin@catalogit.appCreate Date
July 26, 2005Updated By
admin@catalogit.appUpdate Date
November 11, 2023